If you are willing to put in the time, braiding your own horse is an excellent way to save money and you will have a great sense of accomplishment when your horse is turned out to perfection.
For your braiding job you will need: sharp scissors, a rug hook, a plastic mane comb, a tall stool, a metal mane-pulling comb, a brush and bucket for wetting the mane, and mane-matching yarn (when in doubt, go a shade darker.)
1. Start with a well-prepared mane, ideally 5′ if thin and 6′ if thick. The mane should be tapered at the bottom, as it helps it hold the knots well. Avoid cutting the mane, as it becomes blunt and will not braid as tightly. The best option for tapering manes is to use a large body clipper blade to tease and cut the length. Done well, the line is clean and natural. The bottom line of the mane should be straight and slightly longer toward the poll. It is a myth that a dirty mane is easier to braid, so wash it the day before the show to avoid dandruff and scurf showing. Remember, no Show Sheen in the mane!
2. Keep the mane wet using the brush. For extra hold, dilute a small amount of a product like Quick Braid in the water. Wet manes keep braids tight and prevent wispy hairs, but not so wet that water is dripping irritatingly down the neck. Stand on a safe stool so you are above and directly in front of the area you are braiding, starting at the poll. You need to be able to exert a steady pull downward as you braid; this is where most issues with crooked braids begin. Start your braid as high and tight as possible to the crest using less than an inch-width of mane, and remember to exert a ‘twist’ on each section of the braid when you are crossing them over each other – this is the trick to tightness. One thumb should be over the cross of the braid at all times. Try to make every braid roughly the same size and distance apart. As the mane thickens down the neck, make the braids slightly smaller. You should be aiming for roughly 25-35 braids, depending on the horse.
3. Keeping the braid tight, braid down until you start to feel the mane begin to taper at about eight crossovers. Using your right hand, position the yarn in the two outside pieces of hair, with the middle of the yarn falling under the middle section of the braid. Continue braiding with the yarn incorporated in its respective sections of the braid.
4. Braid down, leaving about an inch of hair below where you will tie the knot, which acts as leverage when the braids are pulled up. Aim to have all the knots in a straight line as you continue down the neck, so pay attention to the amount of crossovers in each braid (usually around 21). When you reach the end of the braid, the yarn should end up in the two sections on the right. Separate the yarn from the mane completely, as stray hairs loosen knots, and then tie a half-hitch knot at the bottom of the last crossover. Make sure knot is at the front of the braid, all the knots are in a straight line, and each braid is evenly spaced and roughly the same size.
5. To pull through, start at the bottom of the neck and insert the rug hook high up and in the centre of the braid. Keeping the braid straight with your fingers as you go, pull the knot through the crossover just enough so that it feels tight to the crest and is just past the hairline; too much and you will have the “palm tree” effect of loose mane coming out of the crest. Step back and make sure all the folds are the same length and the bottom line is straight.
6. For beginner braiders, cross the yarn under the pulled-through braid and tie a square (double) knot on the underside of the looped braid to hold it in place. Established braiders can skip this step and simply cross the yarn under the looped braid. Pull with even tension to ensure tightness. Make another knot on the topside of the braid, under the third crossover on the right side. Pull tight to ensure the braid lies flat on the neck. Tie a double knot behind the braid, which will tidy up any stray hairs. Remember that the eye will be drawn to the bottom line of the braids, which is why you should focus on a straight bottom line at all stages of the braiding process.
7. Pull the excess pieces of yarn to the left side of the braid and flip them over to the other side of the neck. This is your last chance to view all the braids for uniformity. When you are satisfied, pull the yard taut to the left and cut the yarn (making sure not to cut the knots in the process!)
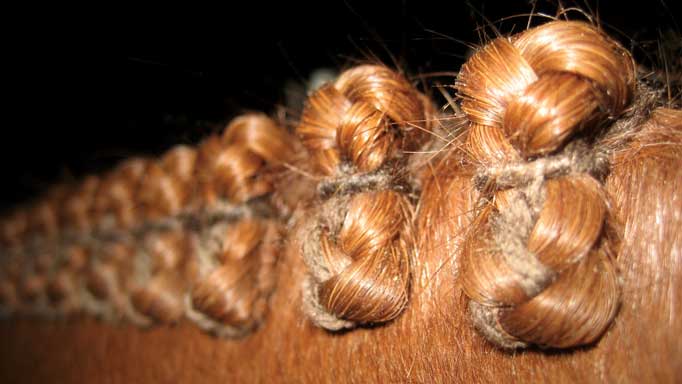
8. The finished product – a beautiful, tidy, uniform braid job.